The Basic Golf Swing:
Golfing for Beginners
Learning the basic golf swing can be challenging but is an essential first step for beginners to golf. With this step-by-step guide from Todd Kolbs, you'll be golfing like a pro in no time.
Pointer 1: Basic Golf Swing Grip
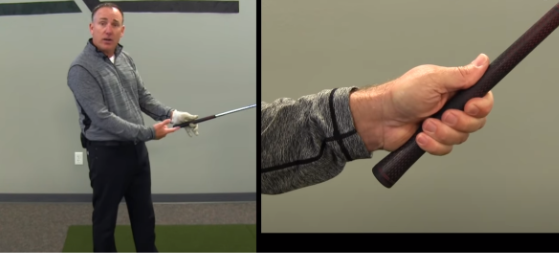
According to Todd Kolb, the grip may sound mundane, but it's actually an important part of golfing for beginners! You don’t want to position the golf club in the palm of your hand because it can prevent you from being able to swing and leverage the golf club appropriately.
To correct this common mistake among new/amateur golfers you’ll want to hold the golf club basically in the fingers. To do this, hold the golf club in front of you at eye level with your dominant hand. You’ll then take your dominant hand and place the palm at the top of the club running diagonally so that it exits through the center of your index finger, closing your remaining fingers around the remaining area.
You’ll know you have the correct grip if you can balance the golf club on the pads at the top and the index finger. It should move like a hinge.

Pointer 2: Thumb Positioning
Positioning your thumb correctly makes a big difference in your golf swing. You don’t want to over extend your thumb because when you get to the peak of your golf swing, the swing gets too long and the club head tends to drop further then it's supposed to.
Instead, a helpful beginners golf swing tip is to have a short left thumb as shown in the picture on the right. This short thumb position works as a brake for you when you get to the peak of your golf swing.

Pointer 3: Set Up 60/40
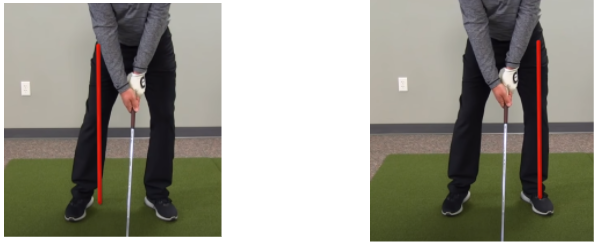
When setting up your basic golf swing, pressure distribution is vital. Instead of putting the majority of your pressure on the back foot, you’ll want to have most of the pressure on your lead foot.
You want 55-60% pressure on your lead foot (shown on the right) and 40-45% pressure on your trail foot (shown on the left).
The reason you want to try this pressure distribution for your golf swing is because you want something called unweighting. If you start with 60% pressure on your lead foot, and start to transition to your trail side, you can start to unweight from your left side into your right heel allowing you to have more momentum for your golf basic swing.
If you start with all your pressure placed on your trail foot, it will be more difficult to create momentum for your golf swing.
Try out this pointer to improve your swing!

Pointer 4: Takeaway-Body Movement
When you get in position to swing the golf ball you want to pivot and turn into your right heel (review pointer 3 to perfect this movement). The right pocket on your pants should move backwards. The pivot will look like the picture on the right.
You want to feel like you're pivoting and turning into your right hip and heel, and you’ll feel some pressure being taken off of your trail foot.
You will want to avoid shifting your hips from side to side, or sliding because it will set you up for some poor shots, and you want excellent shots.

Pointer 5: The Arms and the Club
Now that you’ve learned the above pointers for your basic golf swing, the arms are now going to be incorporated in coordination with the golf club.
As you’re preparing to hit the golf ball, you’ll want to feel your lead arm work into your chest, and the clubface should stay squared or slightly closed.
You want to avoid moving the club out and away because the club face will rotate causing an improper golf swing.
Your swing should look like the picture on the right.

Bonus Pointer: Golfing Drill
If you’ve tried all of the above movements and are still having trouble, then try this simple golf swing drill for beginners. This is a great golf drill to help new golfers pivot and turn instead of slide into your golf swing. Here’s how you do it:
Grab your 8-iron or pitching wedge (eventually you may be able to use a longer club).
Place the golf ball straight out from your lead foot, and place almost all your pressure on your lead foot, letting your trail foot balance behind you.
Begin hitting some shots.
Using this drill will help your body learn to pivot and to rotate, rather than sliding into your turn, which may cause you to fall.
Learning to pivot correctly at the beginning of your golf career will help make golfing more enjoyable, and will improve your form.

Try out these pointers to improve your basic golf swing! You can also access this link to have further insight on these beginner golf swing pointers.

